Epoxy Garage Floor Coating — Prep, Systems, and Chip Broadcast
23 April 2026 · ProPainterTools
Epoxy Garage Floor Coating: Prep, Systems, and Chip Broadcast
Garage floor coatings are a high-margin residential service line — they are visually dramatic, typically installed in a single day for a standard two-car garage, and command premium pricing when executed correctly. They are also one of the most common contractor failure categories. The failure mode is almost always the same: inadequate surface preparation and unchecked moisture vapour transmission. A garage floor that looks acceptable at 30 days can begin delaminating at 90 days if the substrate was not profiled correctly or if moisture vapour was not tested before application. This guide covers the preparation, system selection, and application sequence that produce durable results.
Surface Preparation: CSP 2–3 Is Non-Negotiable
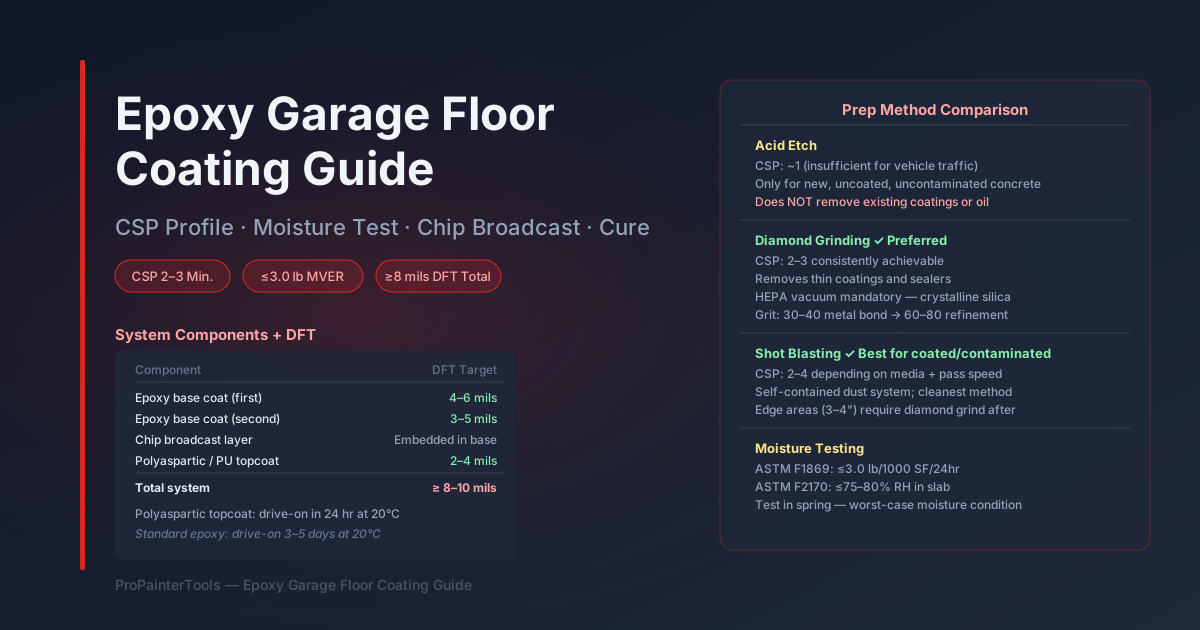
Epoxy coatings require a mechanical anchor to the concrete substrate. Without a minimum Concrete Surface Profile (CSP) of 2–3 (ICRI CSP scale), the coating adhesion is insufficient for vehicle traffic and thermal cycling. The CSP scale runs from 1 (very smooth) to 9 (very rough); CSP 2–3 is the equivalent of medium-grit sandpaper texture.
Three methods for achieving CSP 2–3:
Method 1 — Acid Etching
Acid etching (muriatic acid or safer phosphoric/citric acid alternatives) chemically attacks the concrete surface to open the pore structure. It does not create a mechanical profile equivalent to grinding or shot blasting.
When acid etching is appropriate: Only for new concrete with no contamination, sealer, or previous coating — and only when shot blast or diamond grinding is not available. Many epoxy manufacturers no longer consider acid etching sufficient for vehicle-traffic-rated systems; check your product's technical data sheet.
Acid etch limitations:
- Does not remove existing coatings, sealers, or oil contamination — those must be addressed separately
- Effectiveness varies with concrete porosity — dense concrete may not etch adequately
- Leaves residual chlorides if muriatic acid is used and rinsing is insufficient — chlorides under a coating accelerate corrosion of embedded rebar and cause osmotic blistering
Method 2 — Diamond Grinding
Diamond grinding with a planetary or single-head grinder produces CSP 2–3 and removes light contamination, thin sealers, and previous failed coatings. It is the most controllable method for residential garage floors.
Equipment: A 10–17" single-head angle grinder with diamond cup wheel works for small areas. A 20–32" planetary grinder (3-head or 5-head) is efficient for a full two-car garage and produces a more uniform profile. Dust extraction (HEPA vacuum system) is mandatory — concrete dust contains crystalline silica (OSHA PEL 0.05 mg/m³ as respirable fraction; HEPA vacuum + N100 or P100 respiratory protection required).
Grit sequence: 30–40 grit metal-bond segments for initial profile and coating removal; 60–80 grit for smoothing and profile refinement to CSP 2–3.
Method 3 — Shot Blasting
Shot blasting uses steel media propelled by a centrifugal blast wheel to impact and profile the surface. A self-contained shot blast machine recirculates the steel shot and contains dust, making it the cleanest of the three methods. It produces a consistent CSP 2–4 depending on media size and pass speed.
For residential garages: A 10–14" portable shot blaster is practical for a two-car garage floor. Shot blasting is faster than diamond grinding for full-floor prep but requires renting or owning specialised equipment. Edge areas within 3–4" of walls must be diamond-ground after shot blasting — the blast wheel cannot reach edges.
Shot blasting is the preferred method for removing paint, tile adhesive, or other contamination from garage floors, as the mechanical impact removes the contamination layer more completely than grinding.
Oil and Contamination Removal
Oil contamination from vehicle drips is the most common adhesion failure cause on garage floors. Oil penetrates concrete and cannot be fully removed by mechanical preparation alone.
Oil treatment process:
- Apply a commercial oil degreaser (alkaline cleaner) to contaminated areas
- Scrub and allow dwell time per label directions
- Rinse thoroughly
- Apply a dry, powdered degreaser (cat litter or floor absorbent) to draw residual oil to the surface
- Sweep, then grind the contaminated area aggressively to remove the oil-penetrated layer
- Re-degrease and confirm water beading is no longer present in the treated area
Severe oil contamination (decades of drip accumulation) may not be fully removable. In these cases, apply an oil-stop primer (a penetrating epoxy sealer specifically formulated to seal oil-contaminated concrete) before the base coat system.
Moisture Vapour Transmission Testing
Moisture vapour transmission (MVT) is the movement of water vapour from the soil through the concrete slab. Slab-on-grade garage floors have no vapour barrier in most residential construction. MVT above the epoxy system's tolerance causes osmotic blistering and delamination.
Test methods:
ASTM F1869 (Calcium Chloride Test): Measures Moisture Vapour Emission Rate (MVER) in lbs per 1,000 SF per 24 hours. Limit for most epoxy systems: ≤3.0 lbs/1,000 SF/24 hr. Test requires 24-hour dwell time after a 24-hour conditioning period — takes 48 hours per test location. Minimum one test location per 1,000 SF of floor.
ASTM F2170 (In-Situ Probe Test): Measures relative humidity within the concrete slab. Limit for most epoxy systems: ≤75–80% RH. Probes are inserted into pre-drilled holes in the slab and equilibrate for 72 hours before reading. More representative of slab moisture condition than F1869.
What to do with high moisture results: If MVT or RH exceeds your product's limit, apply a moisture-tolerant epoxy primer (typically 100% solids epoxy or moisture-mitigation epoxy formulated to bridge vapour emissions up to 25 lbs/1,000 SF/24 hr or 98% RH). These products are significantly more expensive than standard epoxy primers but prevent the failure.
Seasonal variation: Test moisture in the spring or during wet weather — this represents the worst-case condition. A slab that passes in August may fail a test in April.
System Components
A complete garage floor coating system consists of three components:
1. Primer / Base Coat (2K Epoxy)
A 100% solids or high-solids (85%+) two-component epoxy applied at 100–150 mils WFT (wet film thickness) per coat. 100% solids epoxy produces negligible VOC emissions (important in enclosed garage spaces) and the highest DFT per coat.
Mix ratio discipline: 2K epoxy mix ratios are critical — a 2:1 (by volume) epoxy must be mixed at precisely 2:1. Under-catalyst results in soft, tacky film that never fully cures. Over-catalyst accelerates cure and reduces pot life without improving final film properties. Use calibrated mixing containers, measure by weight if possible (more accurate than volume), and mix thoroughly for the full manufacturer-specified time (typically 3–5 minutes power-mixing).
Induction time: Many 2K epoxy formulations require an induction (sweat-in) period after mixing and before application — typically 10–30 minutes. Induction allows the chemical reaction to begin and produces better film formation. Check the TDS.
2. Chip Broadcast (Decorative Layer)
Colour flake chips (vinyl flakes, 1/16" to 1/4" size) are broadcast into the wet epoxy base coat to create the decorative appearance and add texture that improves slip resistance.
Full broadcast vs partial broadcast:
- Full broadcast: Chips are broadcast to excess — enough chips to fully cover the wet epoxy surface. The result after scraping and topcoating is a 100% chip coverage, uniform texture surface. Most popular residential system.
- Partial broadcast: Chips are broadcast sparingly for a lighter, speckled appearance with visible epoxy base between chips. Lower material cost; less textured finish.
Application technique: Broadcast chips immediately after epoxy application while the epoxy is still wet. Walk backwards, broadcasting from shoulder height to distribute evenly. Apply generously — excess chips are swept up after cure (typically 4–8 hours at 20°C). Sweep excess, then lightly scrape the surface with a floor scraper to remove loose and curling chips before topcoating.
3. Topcoat (Polyurethane or Polyaspartic)
The topcoat seals the chips, provides UV stability, chemical resistance, and controls final sheen. Two primary options:
Polyurethane topcoat:
- UV stable (does not amber like standard aromatic epoxy)
- Good abrasion and chemical resistance
- 4–8 hour recoat window at 20°C
- VOC content varies — check for enclosed space application
Polyaspartic topcoat (aliphatic polyurea):
- Fastest cure: 15–45 minute pot life; drive-on in 24 hours vs 72 hours for epoxy/PU
- UV stable — no yellowing
- Excellent abrasion resistance
- Higher material cost; narrow application window in hot weather (accelerated cure)
- Allows same-day full system application: prep in the morning, base coat, chips, topcoat, and walk-on the same afternoon in warm conditions
DFT Targets
| Component | Target DFT |
|---|---|
| Epoxy base coat (first coat) | 4–6 mils |
| Epoxy base coat (second coat, if applied) | 3–5 mils |
| Chip layer | Not measured — embedded in base coat |
| Polyaspartic / PU topcoat | 2–4 mils |
| Total system DFT | ≥8–10 mils |
Measure DFT after the base coat cures using an electromagnetic gauge (concrete is non-ferrous — use the eddy current mode). Verify topcoat DFT from wet film gauge readings during application.
Cure Before Vehicle Traffic
Epoxy systems cure by chemical reaction, not evaporation — cure rate is highly temperature-dependent.
| Temperature | Walk-On | Light Vehicle | Full Cure |
|---|---|---|---|
| 10°C | 12–24 hr | 5–7 days | 7–14 days |
| 20°C | 8–12 hr | 3–5 days | 5–7 days |
| 30°C | 4–8 hr | 2–3 days | 3–5 days |
Polyaspartic topcoats accelerate these timelines significantly — light vehicle traffic in 24 hours at 20°C is achievable.
Communicate cure requirements to clients clearly in writing — a client who parks a vehicle on a 24-hour epoxy base coat is the contractor's worst callback.
For the broader concrete and masonry preparation context — including ICRI CSP standards and moisture testing procedures — see our masonry and concrete surface preparation guide. For the 2K epoxy and polyaspartic chemistry in detail, see our two-component coating systems guide.
ProPainterTools calculates 2K epoxy material quantities by area, mixing ratios by batch, and chip broadcast coverage — keeping your material planning accurate for a system with zero tolerance for mid-job shortages.
Frequently Asked Questions
Can I apply epoxy over an existing epoxy garage floor coating? If the existing coating is well-adhered (tape test pass, no delamination, no peeling), mechanically abrade the surface with 60–80 grit diamond or sandpaper to produce CSP 1–2, clean thoroughly, and apply a bonding primer or new 2K epoxy base coat. If the existing coating is delaminating, it must be removed to bare concrete before re-coating. Applying over a failing system is the most common cause of new system failure.
What causes bubbles in the epoxy after application? Three causes: outgassing (air escaping from concrete pores as the epoxy covers them — prime the slab and allow to cure before the colour coat; or apply epoxy in thin coats during cooler hours), moisture vapour (MVER above tolerance — requires moisture-tolerant primer), or over-rolling (introducing air through aggressive roller application — use a 3/16" nap roller with light pressure).
How do I price a garage floor coating job? A standard two-car garage (approximately 50–60m²) with full chip broadcast and polyaspartic topcoat is typically priced at $3–$7/SF ($30–$75/m²) depending on system, market, and prep complexity. Pricing above market rates is sustainable when you can demonstrate product quality, moisture testing, and a proper warranty. Day-labour epoxy kits from hardware stores are your competition on price — compete on quality and durability documentation.
Is an acid-etched floor adequate for vehicle traffic? For residential pedestrian traffic only — possible. For daily vehicle traffic (parking, hot tyre pick-up, oil and fuel drips) — not adequate. Vehicle traffic requires CSP 2–3 achieved by diamond grinding or shot blasting. Hot tyre pick-up (tyres pulling the coating off the floor when the vehicle moves) is the most visible failure of under-profiled epoxy under vehicle conditions.
