Deck and Fence Staining Guide — Wood Species, Prep, and Product Selection
23 April 2026 · ProPainterTools
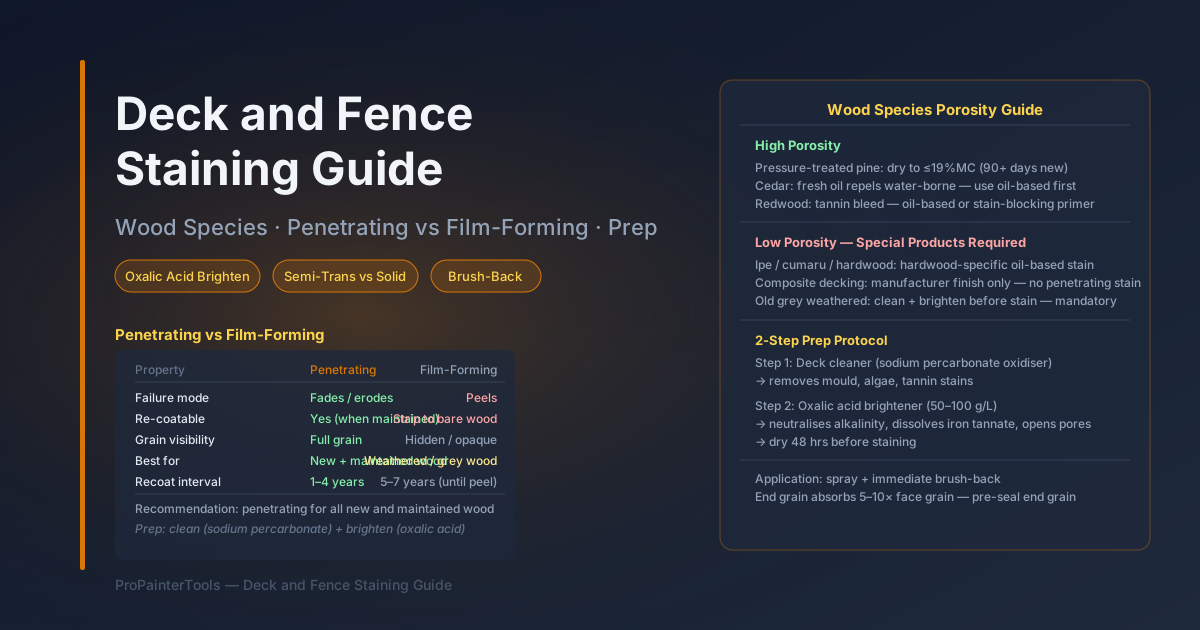
Deck and Fence Staining: Wood Species, Prep, and Product Selection
Deck and fence staining is one of the highest-margin service lines in residential painting — clients call annually, the work is visible and quickly rewarding to execute, and the scope is self-contained. But it is also one of the most technically nuanced jobs in the trade: the wrong product on an already-coated surface fails within one season, oxalic acid brightening is skipped by contractors who do not understand why it matters, and wood species variation changes the entire product selection logic. This guide covers the technical decisions that separate contractors who have callbacks from those who do not.
Wood Species and Porosity
Not all wood stains the same way. Porosity — how readily the wood accepts a penetrating coating — varies dramatically by species and condition.
High-porosity species (absorb stain readily):
- Pressure-treated pine: Highly porous when new; must fully dry before coating (typically 90+ days for new PT lumber — check MC ≤19% with a pin meter). Takes stain unevenly at first; second coat in the same season improves depth.
- Cedar: Natural oil content in fresh cedar repels water-borne penetrating stains. Best results with oil-based penetrating stains on fresh cedar, or allow cedar to weather 1–2 months before applying water-borne product.
- Redwood: Similar to cedar. Natural extractives (tannins) bleed through water-borne primers and light-coloured stains. Use a stain-blocking primer or oil-based penetrating product.
Low-porosity species (resist penetration):
- Composite decking: Not a candidate for penetrating stains — most composite decking cannot accept meaningful stain penetration. Confirm with the manufacturer; some have proprietary finishes. Painting composite decking is typically not recommended by manufacturers.
- Hardwoods (ipe, cumaru, tigerwood): Dense tropical hardwoods are extremely low in porosity. Penetrating stains designed specifically for hardwood decking (typically oil-based with exotic-wood carriers) are required. Standard pine-formulated stains sit on the surface and peel.
- Old weathered wood: Grey weathered wood is oxidised and contaminated with mill glaze breakdown products, mould spores, and dirt. It cannot absorb a stain uniformly until cleaned and brightened. See preparation section.
Grain orientation matters: End grain absorbs stain at 5–10× the rate of face grain. Apply stain to end grain (post ends, cut edges, board ends) first, let penetrate, and then coat face grain — or use an end-grain sealer to equalise absorption before the full stain coat.
Penetrating Stain vs Film-Forming Finish
This is the most consequential product decision for deck and fence work.
Penetrating (transparent or semi-transparent) stains:
- Penetrate into the wood cell structure — do not form a continuous film on the surface
- Wear by gradual fading and erosion, not by peeling
- Re-coatable without stripping (when properly maintained — see recoat intervals)
- Show wood grain and texture clearly
- Less slippery on horizontal deck surfaces than film formers
- Lower build per coat — typically one to two coats
Film-forming finishes (solid stains, paints, sealers with resin):
- Form a continuous film on the surface like a paint
- Opaque or semi-opaque — hide most or all wood grain
- Fail by peeling when moisture penetrates beneath the film
- Cannot be re-coated without stripping to bare wood when peeling begins — this is the critical failure mode
- Greater colour choice and UV protection
- Higher build; better for weathered or rough-sawn surfaces that benefit from filling
The contractor's recommendation rule: For new wood and well-maintained wood, penetrating semi-transparent stains are almost always the right choice — lower maintenance burden and no catastrophic failure mode. Film-forming solid stains are appropriate for very weathered wood where the contractor wants to restore colour and hide surface condition, or for fences and railings (vertical surfaces, no foot traffic) where the peeling failure mode is less problematic. Set client expectations clearly before applying a solid stain to any horizontal deck surface.
Stripping Old Film-Forming Finishes
If the existing deck has a peeling, flaking, or bubbling film-forming finish, it must be removed before re-coating. Applying a new penetrating stain over residual old film produces a product incompatibility failure — the new stain cannot penetrate through the old film.
Three stripping methods:
Chemical stripper: Most effective on heavy old film buildup. Apply a deck stripper (sodium hydroxide or methylene chloride-based, following label instructions). Allow dwell time per the label (typically 15–30 minutes). Scrub with a stiff brush. Rinse thoroughly with pressure wash. Neutralise sodium hydroxide-based strippers with a mild acid rinse (oxalic acid or wood brightener) — residual alkalinity raises wood pH and inhibits adhesion of oil-based stains.
Pressure washing: 1,500–2,500 PSI with a 25° or 40° fan tip removes old semi-transparent stain and light peeling solid stain. Not sufficient for heavy film-forming finishes — the film resists water pressure more than it resists mechanical or chemical stripping. Do not use zero-degree tips on wood — they drive the wood grain and leave permanent gouges.
Mechanical sanding: A belt sander or random orbital sander removes old finish to bare wood efficiently on flat decking boards. Required for any residual film that chemical or pressure wash stripping cannot fully remove. Sand with the grain; 60–80 grit for aggressive removal, 100–120 grit for final smoothing before stain. Produces significant dust — appropriate respiratory protection required.
Combining methods: On decks with mixed failure modes (peeling solid stain in some areas, intact stain in others), strip aggressively with chemical and pressure wash, then spot-sand the remaining film areas to bare wood. The goal is a uniform substrate — patchy old finish over fresh bare wood produces visible colour variation in the new stain.
Cleaning and Brightening with Oxalic Acid
After stripping and before staining, two-step cleaning and brightening is standard practice for all wood decks that have any weathering.
Step 1 — Deck cleaner (oxidiser): A cleaner containing sodium percarbonate or similar oxidiser removes mould, algae, dirt, and tannin stains. Apply, scrub, dwell, rinse. This step removes biological contamination and restores colour to grey weathered wood.
Step 2 — Wood brightener (oxalic acid): Oxalic acid is a mild organic acid that:
- Neutralises residual alkalinity from sodium hydroxide strippers
- Dissolves iron tannate staining (the grey/black discolouration from iron fasteners reacting with wood tannins)
- Opens wood fibres by slightly lowering wood pH, improving penetrating stain absorption
- Restores natural wood colour — returning grey cedar to its honey-tan appearance
Application: Mix oxalic acid per label directions (typically 50–100g/litre water). Apply to clean, damp wood. Allow 10–15 minutes dwell. Rinse thoroughly with clean water. Allow wood to dry completely before staining (minimum 48 hours in warm, dry conditions — longer in cool or humid weather).
Why contractors skip this step: Time pressure and client cost sensitivity. The result of skipping brightening on a stripped deck is visible: uneven stain penetration, blotchy colour, and faster UV greying. It is 30–45 minutes of additional labour that prevents a callback.
Semi-Transparent vs Solid Stain Trade-Offs
| Property | Semi-Transparent | Solid Stain |
|---|---|---|
| Grain visibility | Full grain visible | Grain hidden (opaque or near-opaque) |
| Failure mode | Fades and erodes gradually | Peels — requires stripping to bare wood |
| Re-coatability | Yes, without full strip (when maintained) | No — must strip to bare wood when peeling |
| UV protection | Moderate | High |
| Colour range | Limited (natural tones) | Full colour range |
| Foot traffic | Slightly lower sheen — less slippery | Smoother film — can be slippery when wet |
| Best for | New and well-maintained wood | Heavily weathered or discoloured wood |
Application Technique
Sprayer vs brush-back: Apply penetrating stains by airless sprayer (0.013–0.017" tip, 60–150 PSI) or roller, followed immediately by back-brushing with a natural-bristle brush. Brush-back works the stain into the wood, eliminates lap marks, and removes excess stain that would otherwise puddle in grain and dry sticky. Lap marks are the most common application defect on decks; brush-back eliminates them.
Horizontal surfaces: Apply thin, even coats and maintain a wet edge. On hot decking in direct sun, work in smaller sections — 10–15 boards at a time — to prevent dry-lap marks from stain that sets before the next section is applied. Apply in the morning or on overcast days for board-and-batten and horizontal surfaces.
Fence application: Vertical surfaces are more forgiving — stain runs can be caught by back-brushing before drying. Fence pickets should be sprayed from both sides where possible; penetration from one side is incomplete. A pump sprayer with a shield board behind the fence works on privacy fences where access is limited to one side.
Number of coats: One coat is typically insufficient for a first application on bare or stripped wood — two coats the same day (wet-on-wet or after 2-hour tack-free window depending on product) is standard. Maintenance recoats on existing penetrating stain in good condition: typically one coat.
Recoat Intervals
Penetrating stains require maintenance before failure — the recoat window is the period when a maintenance coat can be applied without stripping.
| Condition | Recoat Action |
|---|---|
| Stain repelling water (beads) | No action needed |
| Water absorbing but colour intact | Maintenance coat — clean and recoat without stripping |
| Grey weathering in some areas | Clean, brighten, recoat — still no stripping |
| Peeling or flaking (film-forming failure) | Strip and start from bare wood |
Typical recoat intervals by product type:
- Oil-based penetrating stain: 2–4 years, depending on exposure
- Water-borne penetrating stain: 1–3 years
- Solid stain: 5–7 years if maintained; strip required when peeling begins
Upsell opportunity: Offer annual deck maintenance inspections in late winter. A contractor who inspects decks before the season starts and identifies those approaching recoat interval books those jobs during the off-season. Clients who see the same contractor annually for maintenance become referral sources.
For the surface preparation that underlies all deck work — moisture testing, substrate condition assessment, and substrate-specific prep methods — see our wood substrate preparation guide. For exterior paint and stain application conditions, see our exterior repaint guide.
ProPainterTools calculates material quantities for deck staining by total area and number of coats, factoring in product spread rates for penetrating stains — producing accurate material cost estimates without guesswork.
Frequently Asked Questions
Can I apply a water-borne stain over an existing oil-based stain? Yes, provided the oil-based stain has adequately cured (typically 30+ days) and is not peeling or flaking. Clean thoroughly, allow to dry, and apply the water-borne product. The water-borne stain will not penetrate as deeply as a fresh oil-based coat but will bond to the surface adequately. For new construction or fully stripped wood, oil-borne penetrating stains typically outperform water-borne on first application for depth and durability — but subsequent maintenance coats can be water-borne.
Why is the stain turning grey within one season? Three causes: insufficient prep (mould or mill glaze contamination preventing penetration), application in direct sun causing surface drying before penetration, or insufficient coats on a highly porous substrate. Assess which applies and address for the re-application.
The client says their deck was stained two years ago and it looks fine — do I still need to prep? Clean and inspect regardless. A deck that "looks fine" may have invisible mould growth under the surface stain or moisture levels that prevent re-coating adhesion. A clean, brightened substrate produces better adhesion and colour consistency than one that merely appears clean. The prep is the job — the stain is just the finish.
How do I price deck staining? Deck staining is typically priced by the square foot of deck area (including handrails and stairs as separate line items at a higher per-unit rate). Base price ranges vary widely by market, but $3–$6/SF for the deck surface (clean, brighten, and two-coat stain) plus $8–$15/linear foot for railings and $30–$60 per stair tread is a common residential starting range. Strip and restain (chemical strip included) runs $6–$10/SF or more.
