Peeling Paint Diagnosis and Repair — Identify the Failure Before You Fix It
3 March 2026 · ProPainterTools
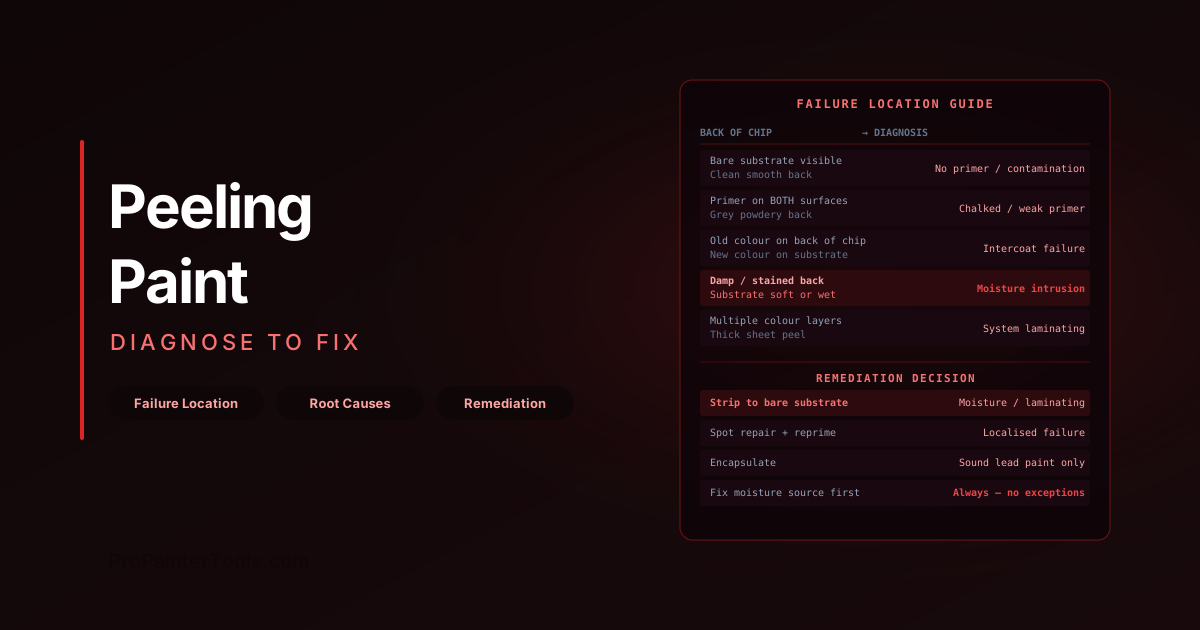
Peeling Paint Diagnosis and Repair: Identify the Failure Before You Fix It
Peeling paint is a symptom, not a problem. The problem is whatever is causing the coating to separate from its substrate or from the previous coat — and if you scrape, prime, and repaint without identifying that cause, the new coat will fail in the same way, on the same schedule, as the one you removed. Peeling paint diagnosis is the most commercially valuable skill a painting contractor can develop: it separates contractors who fix the symptom from contractors who fix the problem, and it is the foundation of a warranty you can actually stand behind. This guide covers how to read the failure location, the root causes that match each failure pattern, and the remediation decision that follows from the diagnosis.
Read the Failure First
Before removing any peeling paint, spend five minutes examining it carefully. The location of the failure — which interface it occurred at — is the most reliable indicator of root cause.
Use a pocket knife or putty knife to lift a small piece of peeling paint and examine both the back of the detached piece and the surface it separated from:
- Is bare substrate visible where the paint separated? → Adhesive failure at the substrate-to-primer interface
- Is there primer (or old paint colour) on both the back of the detached piece AND on the substrate? → Cohesive or intercoat failure within the coating system
- Does the detached piece show layers — two or more colours? → Intercoat failure; the top system failed to adhere to the underlying system
- Is the substrate damp, soft, or stained? → Moisture-driven failure from behind the substrate
The location and character of the failure tells you where the weak point is. Treating the wrong interface — or not treating the root cause — guarantees repeat failure.
Failure Location as a Diagnostic Tool
| Where Paint Separates | Visible Evidence | Most Likely Root Cause |
|---|---|---|
| Substrate surface — bare wood or concrete exposed | Clean substrate on back of chip; no primer on substrate | No primer; contamination; wrong primer for substrate; mill glaze not removed |
| Within primer layer | Primer on both surfaces; grey powdery substrate-side face | Chalked or weak primer; over-thinned primer; application in rain or very high humidity |
| Between old paint and new paint | Old colour clearly visible on back of chip; new colour on substrate | Inadequate surface prep on existing paint; incompatible systems; old coating too chalked |
| Within old paint layer | Old colour on back of chip AND on substrate | Multiple old coats, weakest layer failed; over-applied system trapped solvent |
| At substrate surface with moisture staining | Damp or stained back face; substrate surface soft or discoloured | Moisture intrusion from behind |
Moisture-Driven Failure
The majority of exterior paint failures, and a significant portion of interior failures, are moisture-driven. Water migrates through the substrate from behind the paint film — from plumbing leaks, inadequate vapour barriers, rain infiltration through failed caulking or flashing, or condensation. As it migrates outward through a painted surface, it accumulates under the paint film, creating hydraulic pressure that breaks the adhesion bond and eventually causes blistering and peeling.
How to confirm moisture-driven failure:
- Feel the substrate where peeling occurred — is it damp or has it been wet recently?
- Check the exterior of the building at the corresponding location — is there a potential moisture entry point? (Failed caulking, open joint, missing flashing, cracked rendering, leaking gutter above the area)
- Check the interior — is there a wet wall, plumbing fixture, or condensation source behind the surface?
The repair sequence for moisture-driven failure:
- Find and fix the water source. This is not a painting task — it may involve a plumber, a roofer, or a waterproofing specialist. A painting contractor who applies new paint over an active moisture problem is guaranteeing a callback.
- Allow the substrate to fully dry — typically 2–6 weeks for saturated timber or masonry, longer in cool or shaded conditions. Verify with a moisture meter.
- Remove all failed paint back to a firm, adhered film edge. Feather the edges.
- Address any substrate damage (rot, spalling, delamination).
- Prime with an appropriate primer for the dried substrate.
- Topcoat.
Moisture-driven failures on interior surfaces are most common in kitchens, bathrooms, and laundry rooms. Condensation on cold exterior walls during winter is the primary cause — the moisture moves from warm humid interior air through the wall and condenses at the cold face. A vapour retarder on the warm side of the wall and adequate ventilation are the correct solutions; repainting without addressing these is symptomatic treatment.
Application-Error Failure
Application errors produce failure patterns that look different from moisture failures — usually earlier (within weeks to months rather than after the first winter), and without the moisture evidence.
Common application-error patterns:
Failure over contamination: Paint peels as clean sheets, often in large pieces, with no primer on the back. Root cause: the surface was contaminated (oil, grease, silicone polish, form release agent) and was not cleaned before painting. Even a handprint of skin oil is enough to cause local adhesion failure. The back of the detached paint is clean and smooth — it was never bonded.
Failure over wet substrate: Paint delaminates in a blistered pattern, often associated with small circular blisters that burst and peel. Root cause: substrate was above maximum moisture content at the time of application; water vapour from drying drives the film off. Confirm with moisture meter on adjacent still-adhered areas.
Solvent entrapment: Paint appears wrinkled, lifting in irregular shapes, or fails within days. Root cause: topcoat applied before undercoat was sufficiently dry; solvent trapped under the film re-softens the coating as it off-gasses. Common with fast-topcoat schedules in cool or humid conditions.
Failure over chalked surface: Paint peels as intact sheets with chalky powder on the back face. Root cause: the existing coating was chalking (oxidised to a loose powder) and the new coat was applied without washing and scuffing the chalk off first. The new paint bonded to the chalk, not to the sound film beneath it.
Failure at multiple coats (laminating): Multiple layers peel together in a thick sheet. Root cause: the coating system has accumulated beyond the film build the substrate or lowest layer can support. Usually seen on surfaces repainted many times without full removal. The solution is stripping back to bare substrate or to a firmly adhered layer before proceeding.
Remediation Decision: Strip vs Spot Repair vs Encapsulate
Once the failure mode is diagnosed, the remediation scope follows logically:
Full strip to bare substrate:
- Required when moisture intrusion has degraded the substrate
- Required when the entire coating system is poorly adhered (laminating across the whole surface)
- Required when lead paint is present and must be managed (see our EPA Lead-Safe RRP guide)
- The only option that fully removes the risk of repeat failure
Spot repair (remove failed areas, feather and reprime):
- Appropriate when failure is localised (specific sections, specific sides of the building)
- Appropriate when the existing system is sound in most areas and only specific conditions caused the local failure
- Requires addressing the root cause at the failed area before repriming
Encapsulation:
- Appropriate for lead paint that is in sound condition (well-adhered, not deteriorating) — applying a new sound coating over it rather than disturbing it
- NOT appropriate where adhesion failure is occurring — encapsulation of a failing system still fails
The repair sequence (spot repair):
- Remove all loose and failed paint by scraping to a firm edge
- Feather the edges with 80–100 grit sandpaper — hard edges telegraph through new coating
- Spot-prime bare substrate with the appropriate primer for substrate type
- Fill any surface damage (divots, gouges) with appropriate filler
- Allow to dry; sand smooth
- Apply tie coat or full prime coat as specified
- Topcoat
Moisture Exclusion Before Recoating
Regardless of failure mode, no recoating should occur until the substrate is confirmed dry and the moisture source is addressed. On exterior work:
- Verify moisture content with a pin meter on multiple points — target ≤ 15%MC for softwood, ≤ 12%MC for dense species
- Inspect all caulk joints, window perimeters, and penetrations — these are the most common moisture entry points
- Check gutters and downspouts above the affected area
On interior work:
- Fix the leak, plumbing fault, or condensation source before any remediation
- Run a dehumidifier in affected spaces for 48–72 hours before testing moisture levels
- Do not repaint until the source is confirmed resolved
For the moisture testing procedures that confirm the substrate is ready to recoat, see our moisture testing guide. For the full surface preparation standards that apply before repriming, see our surface preparation standards guide.
Use ProPainterTools to document the existing condition, your diagnosis, and the moisture readings at the start of a repair job. This documentation is your defence in any warranty dispute about whether the substrate condition was acceptable when the new system was applied.
Frequently Asked Questions
How can I tell if a paint failure is moisture-related or application-related? The clearest indicator is location and seasonality. Moisture failures almost always occur on surfaces exposed to weather, near water sources, or on cold exterior walls, and they worsen after wet weather. Application failures occur on any surface and present early — usually within the first year. Moisture evidence (damp substrate, staining, blister pattern) confirms moisture drive.
Should I use a peel-bonding primer on a surface that has previously peeled? Peel-bonding primers (penetrating acrylic or epoxy-modified primers) improve adhesion on chalked or weakly adhered existing coatings. They do not fix moisture problems and do not compensate for contaminated substrates. They are a useful tool when the diagnosis is chalking or light adhesion loss on an otherwise stable and dry substrate.
How much of the existing paint do I need to remove before repriming? Remove all paint that is loose, blistered, cracking, or that moves when probed with a putty knife. Sound, firmly adhered paint can remain. The goal is a stable substrate edge — no loose material anywhere in the repair area. Feather the edges of the remaining paint with 80–100 grit before priming.
What causes paint to peel at the ceiling/wall junction specifically? This location is typically intercoat failure — different sheens were applied on ceiling and wall, and the overlap area has one coat over another with incompatible texture or cure level. It can also be a leak from above (the wall is wet above the ceiling line). Inspect the space above (attic, bathroom floor above) for moisture before repainting.
