Caulking and Sealants for Painters — Product Selection, Sequence, and Application
27 February 2026 · ProPainterTools
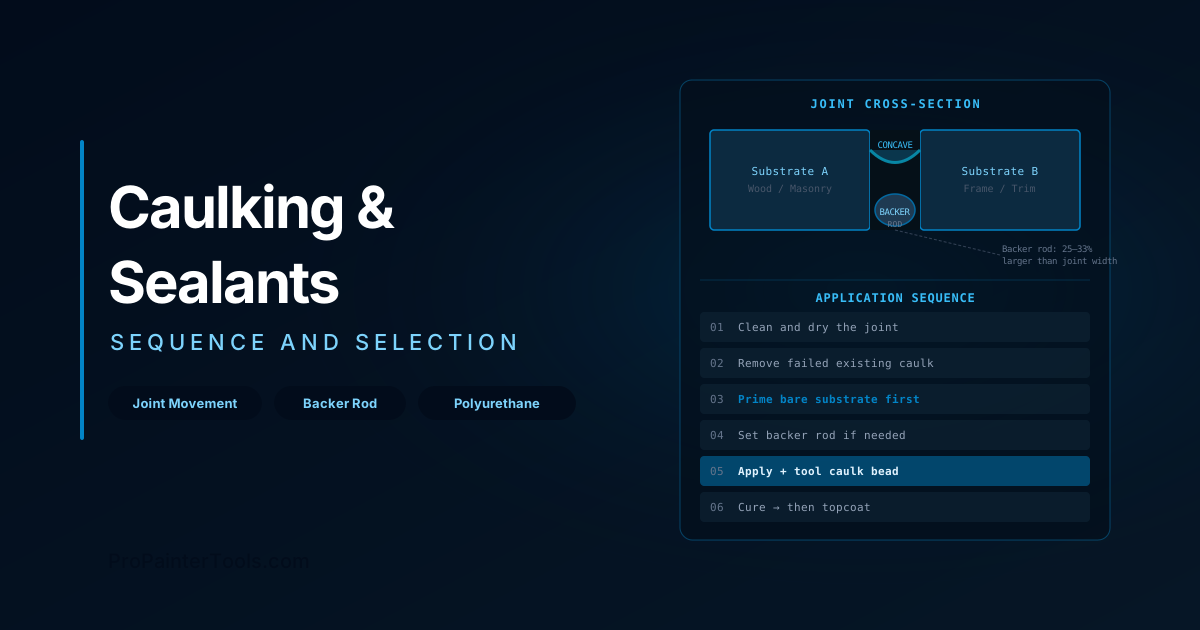
Caulking and Sealants for Painters: Product Selection, Sequence, and Application
Caulking failure accounts for a disproportionate share of exterior painting callbacks. A joint that opens over winter, a window perimeter that separates from the frame, a lap joint that lets water track behind the siding — each of these is a warranty claim that originates in the wrong product or the wrong sequence. Caulking is not a speed step between prep and topcoat. It is a waterproofing and flexibility decision that determines how long the coating system performs. This guide covers how to select the right sealant for each joint type, how to size and set backer rod, and why the application sequence matters as much as the product.
The Role of Caulk in a Coating System
Caulk does two things: it seals against water infiltration and it accommodates movement. Every joint in a building moves — wood expands and contracts with moisture and temperature, masonry settles, dissimilar materials move at different rates. A sealant that can't keep up with joint movement will crack, debond, or split, creating a water entry point directly behind the paint film.
Paint alone cannot bridge joint movement. A coat of latex over a hairline crack that opens 1/16" over a year will crack within one seasonal cycle. The correct spec is: seal the joint with a product rated for that movement, prime the sealant surface, and topcoat.
Joint Classification by Movement Type
Understanding the movement expectation of each joint dictates product selection:
Non-moving joints (< 5% elongation): Cosmetic gaps, interior joints, nail holes, minor surface cracks. An inexpensive paintable acrylic or vinyl-acrylic caulk is adequate.
Low-movement joints (5–15% elongation): Most residential interior trim-to-wall, door casing, and wood-to-wood joints. Premium paintable 100% acrylic latex caulk is the standard.
High-movement joints (15–35% elongation): Exterior window and door perimeters, wood-to-masonry transitions, expansion joints. Paintable polyurethane or silicone-acrylic hybrid required.
Structural expansion joints (> 35% elongation): Control joints in masonry, curtain wall transitions, large format tile perimeters. Two-part polyurethane or silicone sealant — typically out of scope for painting contractors without specialist training.
Product Selection by Substrate and Condition
| Joint Type | Recommended Product | Do Not Use |
|---|---|---|
| Interior trim to drywall | Paintable 100% acrylic latex | Standard silicone |
| Wood-to-wood lap joints (exterior) | Paintable 100% acrylic latex | Vinyl-acrylic |
| Window/door perimeter (exterior) | Paintable polyurethane or silicone-acrylic | Standard acrylic |
| Wood siding to masonry | Paintable polyurethane | Any acrylic |
| Metal flashing to substrate | Polyurethane or butyl-based | Acrylic latex |
| Stucco control joints | Paintable polyurethane | Standard caulk |
| Concrete expansion joints | Two-part polyurethane or silicone | Any paintable caulk |
| Roof-to-wall transition | Butyl tape or formed metal — not caulk | Any paintable caulk |
The one universal rule: Never use standard silicone on any surface that will be painted. Cured silicone prevents paint adhesion even when the label says "paintable." The term "paintable silicone" refers to a silicone-acrylic or silicone-latex hybrid — not pure silicone. If in doubt, do a tape test on a cured bead before committing to a full application.
Backer Rod: Sizing and Placement
Backer rod is closed-cell polyethylene foam cord installed in the joint before caulking. It serves three purposes:
- Controls caulk depth — sealant depth should be 50–100% of joint width, never more. A joint 1/2" wide should have a sealant depth of 1/4"–1/2". Without backer rod, caulk sinks deep into wide joints, creating a thick, rigid bead that cannot flex.
- Creates the correct "hourglass" profile — sealant bonded only at the two joint faces (not the back face) can elongate properly. Three-sided adhesion restricts movement and causes early failure.
- Saves sealant — on wide joints, backer rod reduces product consumption significantly.
Backer rod sizing: Select rod diameter 25–33% larger than the joint width. A 1/2" joint takes 5/8"–3/4" rod. The oversize creates a compression fit and ensures the rod stays in place.
For narrow joints (< 1/4") where backer rod won't fit, use bond-breaker tape (polyethylene tape applied to the back of the joint) to prevent three-point adhesion without adding depth.
Application Sequence
The sequence matters as much as the product. The single most common caulking error on exterior repaints is caulking over unprimed bare wood.
Correct sequence for exterior repaints:
- Clean and dry the joint — free of dust, loose paint, oil, and moisture. Caulk applied over contamination debonds from the substrate, not from the paint film — so the failure is invisible until it opens.
- Remove failed existing caulk — old caulk that has cracked, pulled away, or hardened should be fully removed with a putty knife or oscillating tool. Applying new caulk over failed caulk creates a build-up that looks fine initially and fails early.
- Prime bare substrate — apply primer to the substrate on both sides of the joint before caulking. This is the step most commonly skipped. Primer seals the surface, prevents the substrate from pulling moisture out of the caulk too quickly (causing skinning before full adhesion), and improves long-term adhesion.
- Install backer rod if joint width warrants it.
- Apply caulk — cut the tube nozzle at 45° to a diameter slightly smaller than the joint width. Apply in a continuous bead, pushing the caulk into the joint rather than dragging over it.
- Tool immediately — use a wet finger, a rounded caulk tool, or a soapy sponge to press the bead into the joint and create a concave profile. The concave profile (curved inward) allows the sealant to stretch when the joint opens, while a convex bead pulls in tension and fails sooner.
- Allow cure time — follow the manufacturer's dry-to-paint specification. Most paintable acrylics are paintable in 30–60 minutes; polyurethanes typically require 24 hours. Topcoating before cure traps solvent and causes wrinkling or adhesion failure.
Common Failures and Their Causes
| Failure Pattern | Most Likely Cause |
|---|---|
| Caulk debonds from substrate (peels away cleanly) | Unprimed substrate or contamination |
| Caulk cracks through the middle | Three-point adhesion or wrong elongation rating |
| Caulk shrinks and pulls away at edges | Applied too thick or over solvent-based primer still off-gassing |
| Paint peels off caulk surface | Topcoated before caulk cured; or silicone contamination |
| Caulk remains soft/tacky | Polyurethane applied below minimum temperature or over-coated too early |
| Caulk stains (brown/grey streaks below joint) | Sealant exuding plasticisers; often vinyl-acrylic used in high-UV joint |
Relating Caulking to the Full Prep Sequence
On exterior repaints, caulking fits between primer and topcoat — not before primer, and not as a standalone step after topcoating is complete. For full exterior repaint workflow including substrate preparation by material and coating system selection, see our exterior repaint guide. For surface preparation standards that apply before caulking and coating, see our surface preparation standards guide.
Use ProPainterTools to document which joints were recaulked as part of your scope of work — this protects you from warranty disputes where a client claims sealant failure on joints that were out of scope.
Frequently Asked Questions
Should I caulk before or after priming on an exterior repaint? After primer. Prime the bare substrate on both sides of the joint, let the primer dry, then caulk. This ensures the primer bonds to wood rather than to the back of the caulk, and prevents the substrate from drawing moisture out of the caulk too fast.
How long does polyurethane caulk need before painting? Most one-component polyurethane sealants require 24 hours before topcoating. Some two-part systems have shorter windows. Check the manufacturer's technical data sheet — the dry-to-paint time is distinct from the full cure time. Full cure for polyurethanes is typically 7–14 days.
Can I apply caulk in cold weather? Most sealants have a minimum application temperature. Acrylic latex: generally 5°C (40°F). Polyurethane: 4°C (40°F) is typical but cure slows significantly below 10°C. Silicone-acrylic hybrids vary. Always check the TDS. Cold substrate temperature matters more than air temperature — a 5°C substrate on a 15°C day will behave like a 5°C application.
What is the expected lifespan of a good exterior caulk joint? A properly prepared and installed polyurethane sealant in a high-movement joint should last 10–15 years. Paintable acrylic latex in a low-movement joint: 5–10 years. These assume proper substrate prep, correct product selection, and no physical damage. Warranty your caulking work for 2 years maximum and state this explicitly in your contract.
