Paint Mixing and Storage — Viscosity Testing, Straining, and Shelf Life
12 April 2026 · ProPainterTools
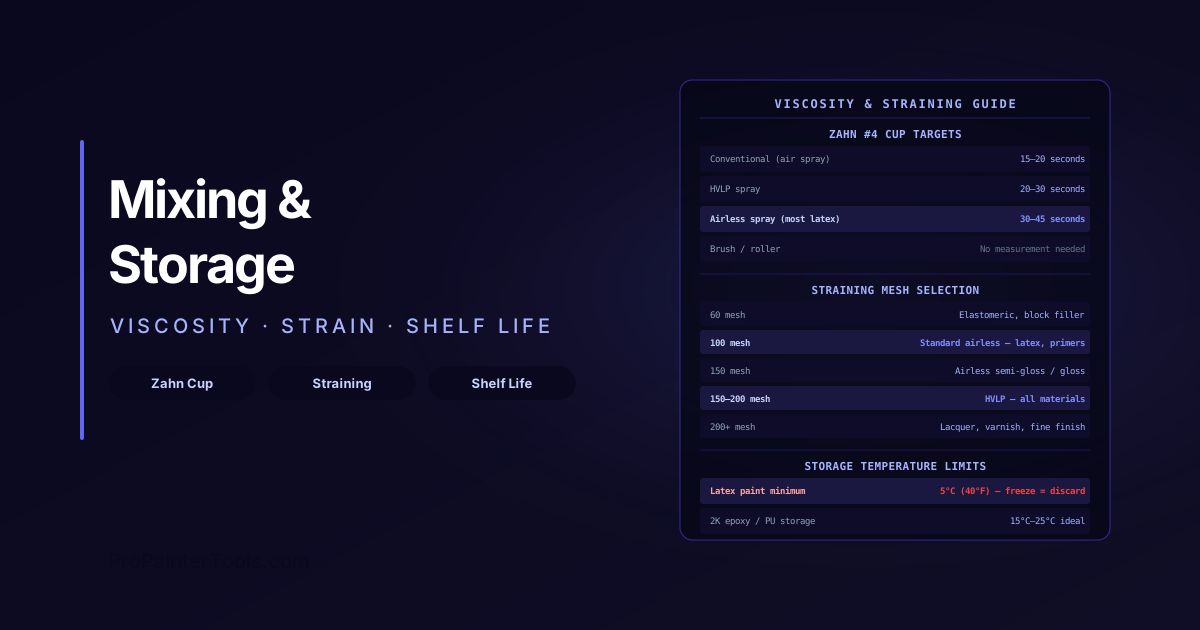
Paint Mixing and Storage: Viscosity Testing, Straining, and Shelf Life
Paint that has not been properly mixed or is applied at the wrong viscosity for the application method produces uneven sheen, poor atomisation, excessive tip clogging, or runs and drips. Paint stored incorrectly loses performance before it is opened, or becomes unusable after a single freeze cycle. These are controllable problems that cost contractors time and material when not managed. This guide covers correct mixing technique, viscosity testing for spray application, straining before spray use, and storage management for material on the job site.
Why Mixing Matters
Paint settles in the can. The heavy components — pigment, titanium dioxide, flatting agents — sink to the bottom over time in storage. The lighter components (resins, carrier) remain on top. A can that has been on the shelf for six months can have a solid layer of pigment on the bottom that looks like the can is ruined. It is not ruined — it requires thorough mixing to bring it back to a homogeneous state.
Mixing is also required for:
- Re-dispersing flattening agents that settle in flat and low-sheen paints (affects final sheen if not mixed)
- Re-incorporating colorants added at the point of sale — tinted paint should be re-shaken at the store and mixed again on site before use
- Blending the first and last of multiple cans of the same colour (batching) — box the material before starting to eliminate visible batch variation
Drill Mixer Paddle Selection
A mixing paddle attached to a slow-speed drill is the correct way to mix most architectural paints on a job site. Using the wrong paddle or the wrong speed creates air entrainment — introducing bubbles into the paint that produce pinholes and foam in the applied film.
Paddle types:
- Jiffy mixer (helical paddle): The standard for architectural paint. The helical shape folds material up from the bottom and circulates it through the bucket. Good for latex, primers, and standard architectural coatings.
- Egg-beater / potato masher paddle: More aggressive mixing action. Use for thick materials (elastomeric, block filler) that resist the helical paddle. Not for standard latex — too much air entrainment.
- Box-cage mixer: Used for thin materials (stains, varnishes) and for mixing in large open-top containers. Provides good circulation without excessive air entrainment.
Speed:
- Use a slow-speed (200–400 RPM) drill setting. High speed creates a vortex that pulls air into the material.
- The mixing vortex should barely break the surface of the paint — visible as a shallow dimple in the centre. A deep funnel vortex means the speed is too high.
- Mix for a minimum of 2–3 minutes for paint that has settled. For deep-colour tinted paint just home from the store, 1–2 minutes of remixing is good practice even if it was shaken at the store.
Mixing procedure:
- Start the paddle moving before submerging it in the paint — this prevents a sudden splash of material.
- Work the paddle up and down through the depth of the bucket to reach the settled material on the bottom.
- Scrape the bottom and sides of the bucket with a stir stick before removing the paddle to ensure no unmixed material remains.
Zahn Cup Viscosity Testing
For spray application, material viscosity determines the correct thinning required (if any) to achieve optimal atomisation. Different spray equipment types require different viscosity ranges:
- Airless spray: Can handle most architectural latex at container viscosity — little or no thinning required. Very high viscosity materials (elastomeric, block filler) may require slight thinning per the PDS.
- HVLP: More sensitive to viscosity. Standard latex often requires 5–10% thinning with water for good atomisation through an HVLP gun.
- Conventional (air spray): Requires the lowest viscosity; most materials need thinning to 20–25 seconds in a No. 4 Zahn cup.
Zahn cup testing: A Zahn cup is a small vessel with a calibrated orifice hole in the bottom. Dip it into the material, lift it out, and time how long it takes for the stream of paint to break (the point at which the continuous stream becomes intermittent drops). The result is expressed in seconds.
Common Zahn cup sizes:
- No. 2: For thin materials (stains, sealers, thin lacquers)
- No. 3: For medium materials (lacquer, varnish, waterborne topcoats)
- No. 4: For standard architectural latex and primers
- No. 5: For thick materials (high-build primer, elastomeric — though these may be off-scale)
Typical target ranges:
| Application Method | Viscosity Target (Zahn #4) |
|---|---|
| Conventional (air spray) | 15–20 seconds |
| HVLP | 20–30 seconds |
| Airless spray | 30–45 seconds (most latex container viscosity falls here) |
| Brush/roller | No measurement required — use container viscosity |
Thinning: If viscosity is too high for the application method, thin in 5% increments (water for water-borne, appropriate solvent for oil-based). Re-test after each addition. Do not exceed the thinning limit stated in the PDS — over-thinning reduces film build per coat, hiding power, and VOC compliance (for solvent-thinned oil-based materials — see our VOC regulations guide).
Straining Before Spray Application
Paint should be strained through a mesh filter before loading an airless or HVLP sprayer. Even freshly purchased paint can contain dried skin, pigment lumps, or debris that will clog the tip or gun filter mid-job.
Mesh selection:
| Mesh Size | Use |
|---|---|
| 60 mesh | Coarse straining — elastomeric, thick block filler |
| 100 mesh | Standard airless spray — latex, primers, enamels |
| 150 mesh | Fine straining — airless for semi-gloss and gloss |
| 150–200 mesh | HVLP — all materials |
| 200+ mesh | Lacquer, varnish, fine finish spray |
Straining procedure:
- Use a conical mesh strainer (paper or nylon) dropped into the spray pot or a 5-gallon bucket.
- Pour the paint through the strainer slowly — forcing thick material through tears the mesh.
- For very thick materials, thin slightly before straining to allow material to pass without tearing the filter.
- Discard used strainers — attempting to clean and reuse paper strainers introduces water into solvent-borne materials.
Never skip straining for spray application. Tip clogs mid-job are almost always debris that straining would have caught.
Storage Temperature Limits
Paint and coatings have a minimum storage temperature below which performance is permanently compromised. This is a particular risk for exterior storage on job sites, in unheated vehicles, and in temporary storage over winter.
Latex (water-borne) paint: Minimum storage temperature is 5°C (40°F). Below this temperature, the latex particles in the emulsion can coagulate irreversibly. A single freeze cycle above approximately -5°C may or may not cause permanent damage depending on the formulation — many modern latex paints include freeze-thaw additives that allow one or two freeze cycles without complete failure, but performance is still degraded.
Identifying freeze-damaged latex:
- Lumpy or curdled texture that cannot be mixed smooth
- Small rubbery particles visible after mixing
- Stringy appearance when drawn out on a surface
- Failure to flow smoothly even after thorough mixing
Freeze-damaged latex paint should be discarded. There is no recovery procedure. Do not use on client work — the film will be rough, lumpy, and will not adhere or cure correctly.
Oil-based and solvent-borne coatings: Tolerate cold storage better than latex — most oil-based paints can withstand freezing without permanent damage (the solvent does not freeze at paint storage temperatures). However, very cold temperatures increase viscosity dramatically — oil-based material stored at 0°C may be too thick to mix or apply until it warms to room temperature.
Two-component systems (epoxy, polyurethane): Store at 15°C–25°C. Cold storage of 2K components can cause crystallisation of the resin (visible as white solid formation). Crystallised epoxy can be restored by warming the container in a warm water bath (not open flame), but this should be verified with the manufacturer. Cold 2K components cure more slowly and incompletely — always bring to 15°C minimum before mixing and application.
Shelf Life After Opening
An opened can of paint does not last indefinitely. Managing leftover material correctly extends shelf life and reduces waste.
Water-borne latex:
- After opening: 1–2 years if properly resealed
- Store with plastic wrap pressed onto the surface of the paint before replacing the lid — this prevents a skin from forming
- Alternatively, store in a smaller container (less air space) with a tight seal
- Test for viability before reuse: mix thoroughly, apply a brush stroke — if the paint is stringy, lumpy, or has an off odour, discard
Oil-based:
- After opening: 1–3 years, sealed
- Pour a small amount of paint thinner on the surface before resealing — this forms a thin oil layer that retards skin formation
- If skin has formed, remove the skin carefully before mixing — do not mix the skin into the paint; it will break into lumps that will not disperse
Two-component systems:
- Mixed: pot life only (30 minutes to 8 hours depending on system)
- Unmixed: shelf life per manufacturer (typically 12–36 months from date of manufacture at specified storage temperature)
- Opened but unmixed Part B (isocyanate hardener): moisture-sensitive — reseal tightly immediately and use within the manufacturer's specified time after opening
For spray viscosity in the context of specific equipment types, see our pro sprayer guide. For proper tip selection to complement the correctly viscosified material, see our spray tip selection guide.
ProPainterTools allows you to log material quantities used per job, track partial cans against job codes, and calculate material cost per square metre — reducing waste and improving estimate accuracy on repeat jobs.
Frequently Asked Questions
Can I mix leftover paints from different cans to extend material? Only if they are the same product type, sheen level, and colour (or close enough to mix to a single acceptable colour). Mixing different brands, sheen levels, or resin types produces unpredictable results. Mixing a flat with a semi-gloss, for example, does not produce a mid-sheen — it produces an unreliable mixture with variable sheen. If mixing between batches of the same product and colour to extend material, test on a sample before committing to a full wall.
Is a paint that has skinned over still usable? If only the surface has skinned and the material beneath is fluid and mixes smoothly, remove the skin and use the material. If the skin is thick (more than a few millimetres) and the material is starting to gel throughout, the paint is too far gone — discard it.
What is "boxing" paint and why is it done? Boxing means combining all cans of the same paint (from the same batch order) into one large container and mixing together before starting the job. This eliminates visible colour and sheen differences between individual cans caused by minor batch variation. Standard practice on any wall that requires more than one can. Essential for critical colour matching.
Does shaking at the paint store replace mixing on site? Machine shaking at the store adequately mixes freshly tinted paint. After transport and a day or two of settling, remixing on site (even briefly) ensures the colorants and pigments are fully re-incorporated. For paint that has been sitting for a week or more, a full 2–3 minute drill-mix is recommended.
