Drywall Repair for Painters — Patches, Skim Coat, Texture, and Primer Selection
13 February 2026 · ProPainterTools
Drywall Repair for Painters: Patches, Skim Coat, Texture, and Primer Selection
Drywall repair is where painting contracts become visible. The client may not know what coverage rate or film build means, but they will immediately notice a patch halo, a flat spot in a semi-gloss wall, or a texture that doesn't match anything else in the room. Done correctly, a repaired and painted wall is indistinguishable from the original. Done incorrectly, every painting contractor who comes after you will point to the patch as the previous guy's work. This guide covers the repair method for each damage type, the feathering technique that makes repairs disappear, texture matching, and the primer selection that prevents the most visible repair failure: sheen variation.
Match the Repair Method to the Damage
The most common mistake is applying the same repair method to every hole. A 1/4" nail hole and a 6" punch-through require different approaches. Using a backing patch on a nail hole wastes time; using joint compound alone on a large hole produces a sagging, cracked repair.
| Damage Type | Repair Method |
|---|---|
| Nail holes, screw holes ≤ 1/2" | Lightweight spackle, one coat, minimal sand |
| Dents and dings ≤ 2" | Lightweight spackle or setting-type compound, sand flush |
| Cracks (hairline) | Flexible joint compound, paper tape optional for long runs |
| Holes 2"–4" | California patch or mesh patch with joint compound, 2–3 coats |
| Holes 4"–12" | Backing board (wood or metal stud clip), full drywall piece, tape and mud |
| Holes > 12" | Full panel replacement back to nearest studs |
| Crumbling texture, water damage | Scrape to firm substrate, apply setting compound to consolidate, then skim |
Setting compound vs pre-mixed compound: Setting compound (powder that you mix with water) hardens by chemical reaction — it does not shrink as it dries, making it ideal for filling large voids in a single coat without cracking. Pre-mixed (bucket) compound is convenient for finish coats and feathering but shrinks slightly as moisture evaporates. Use setting compound for fill coats; pre-mixed for finish and feather coats.
The Feathering Principle
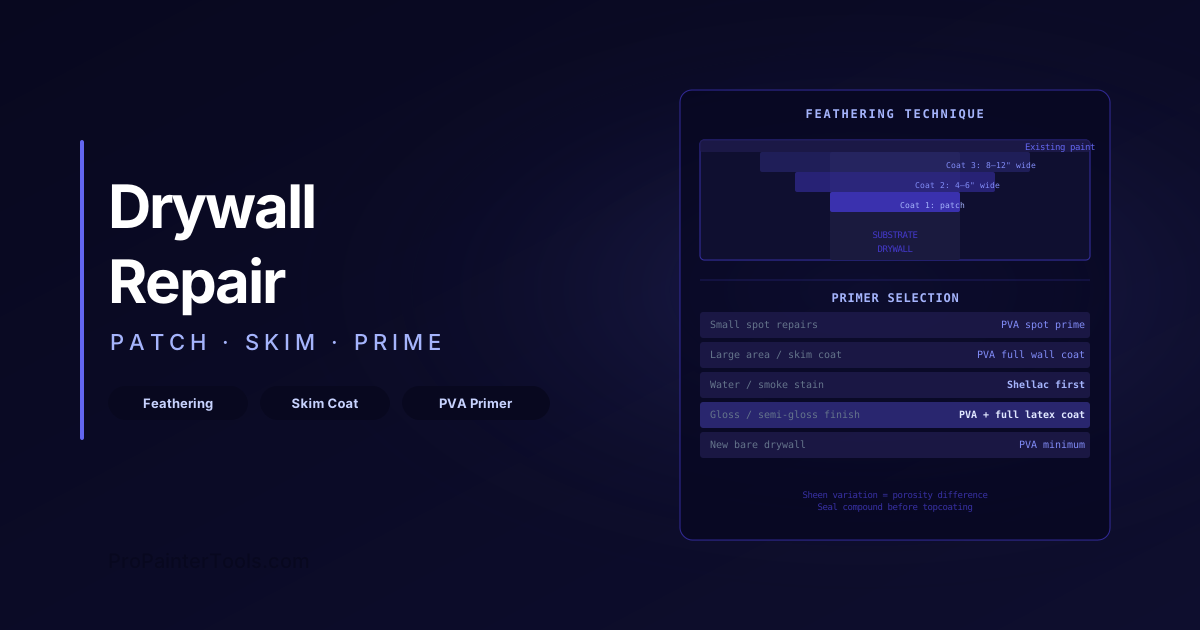
Feathering is the technique that makes repairs invisible. The concept: every coat of joint compound should extend further from the repair centre than the coat beneath it, tapering to a film so thin it can barely be felt against the surrounding wall.
Why feathering works: A repair that stops abruptly at the edge of the patch creates a visible ridge that shadows under raking light. By feathering the compound progressively wider with each coat, the transition from repair to original wall surface is gradual enough that it disappears under paint.
Feathering distances by coat:
- Fill coat (coat 1): covers the repair only, slightly proud of surface
- Body coat (coat 2): extends 4–6" beyond the repair perimeter, feathered to nothing at the edge
- Finish coat (coat 3): extends 8–12" beyond, feathered to an edge thin enough to be nearly invisible
Tools: A 6" blade for the fill coat, a 10"–12" blade for the body coat, and a 12"–16" blade for the finish coat. Wide blades help maintain a consistent feathered edge. Always apply compound with light pressure at the leading edge to thin it to near-zero at the perimeter.
Skim Coat Application
A skim coat is a thin application (1/32"–1/16") of joint compound over an entire wall surface — used to refresh aged, textured, or repainted walls to a smooth finish, or to level walls with extensive minor damage where spot-patching would produce a patchwork of repairs.
When skim is the right call: If a wall has more than 5–6 spot repairs visible, or if previous texture was inconsistent and the client wants smooth, a full skim is faster and delivers a better result than individual patches.
Skim coat process:
- Wipe the wall with a damp sponge to remove dust and loose material
- Apply a thin coat of pre-mixed all-purpose compound using a 12"–14" drywall knife, working in sections of 4–6 SF
- Pull the blade flat across the surface at a shallow angle (10–15° from the wall), leaving a thin, even film
- Allow to dry completely (typically 4–8 hours — skim turns white when dry)
- Sand lightly with 120 grit on a sanding block — skim sanding is about removing tool marks and ridges, not removing material
- A second thin skim coat is typically required to achieve a true smooth finish
- Final sand with 150–180 grit
Texture Matching
Texture matching is one of the most underpriced skills in the trade. Clients with textured walls know immediately when the repair doesn't match. Common textures and how to replicate them:
Smooth / Level 5: Two thin skim coats, sand between, final sand with 180 grit. Requires a perfectly flat surface — any low spots read as a shadow under gloss sheens.
Knockdown: Apply joint compound diluted slightly, then stipple with a roller. Allow to partially set (10–15 minutes), then lightly drag a knockdown knife across at a very low angle to flatten the peaks. The resulting flat-top texture should match the size and density of the surrounding pattern.
Orange peel: Spray applied with a hopper gun or rented texture sprayer at low pressure (20–25 PSI) and medium-high material flow. Practice on cardboard to match the droplet size of the existing texture before spraying the repair.
Sand texture: Mix fine sand into flat paint or use a sand-additive texture compound. Apply by roller — a short-nap (3/8") roller produces finer texture; a longer nap produces heavier.
Popcorn (acoustic): Apply with a hopper gun. Existing popcorn on pre-1978 ceilings may contain asbestos — test before disturbing. If asbestos-positive, encapsulate rather than repair if possible.
Primer Selection After Repair
Primer selection is the most consequential choice in drywall repair, and the most commonly wrong. The wrong primer produces the most visible failure mode in the trade: sheen variation (also called "flashing" or "hot spots"), where the repaired areas appear lighter or darker than the surrounding wall under gloss sheens.
Why sheen variation happens: Joint compound is absorbent. Without adequate sealing, the finish coat soaks into the compound faster than into the surrounding painted surface. This differential absorption changes the film build and sheen — the compound area dries duller, even when the same paint was applied everywhere.
Primer selection matrix:
| Repair Condition | Primer |
|---|---|
| Small spot repairs on existing painted wall | High-build PVA drywall primer, spot-applied to repairs only |
| Skim coat or large repairs on existing painted wall | PVA drywall primer, full wall coat |
| New drywall / bare board | PVA drywall primer minimum; high-hide latex for production |
| Repairs on walls to be finished in gloss or semi-gloss | PVA + one additional latex primer coat over entire wall |
| Repairs with water staining | Shellac-based primer (Zinsser BIN or equivalent) on stains before PVA |
| Repairs with smoke odour | Shellac-based primer full wall |
PVA drywall primer seals the absorbent compound surface and equalises porosity between the repair and the surrounding wall. It is not a stain blocker — water or smoke stains require shellac first.
The professional standard for high-sheen finishes: After spot-priming repairs with PVA, apply one full coat of latex primer over the entire wall before topcoating. This eliminates any remaining porosity variation across the whole surface and is the only reliable way to prevent sheen flashing under semi-gloss or gloss topcoats.
Use ProPainterTools to price drywall repair as a separate line item in your estimate — surface preparation including patching is typically 20–30% of the total interior repaint labour and is the most commonly underestimated scope item.
Frequently Asked Questions
How many coats of joint compound are needed for a standard patch? Minimum three: fill coat, body coat, finish coat. Some repairs need a fourth coat if the fill coat sank more than expected. Setting compound shrinks less than pre-mixed, so it often achieves a flat fill in fewer coats. Never try to fill a large repair in one thick coat — thick compound cracks as it dries.
How can I tell if a patch is ready to paint? It should be uniformly white with no grey or dark areas (which indicate remaining moisture), completely hard, and smooth to the touch. Slightly rough surface from sanding is acceptable — it provides tooth for the primer. If the patch feels even slightly cool to the touch, it is still damp.
Why does my paint always look different over the repairs even after priming? The most common cause is an insufficient or wrong primer. If you used a latex primer on bare compound in a single thin coat, it may not have fully sealed the porosity. The fix is to re-prime with a full coat of PVA drywall primer, allow it to dry completely, then apply another coat of latex primer over the full wall surface before topcoating with the finish colour.
Should I mud over existing texture to create a flat surface, or is that a different job? Skim coating over existing texture to achieve a flat Level 5 finish is a distinct service from standard painting prep and should be quoted separately. It requires full wall skim coats with significant drying, sanding, and priming time. Communicate this clearly — clients often assume "just smooth it out" is included in a painting quote.
